在智能手机和平板电脑盛行的数字时代,通过触摸屏控制设备已成为我们的第二天性。逐渐地,这项革命性的新技术也在工业领域得到采用。经常有人问我们,是否可以通过触控设备控制 HALCON 窗口。在本文中,我们会为您说明如何轻松为 HSmartWindowControlWPF 添加 Pinch-to-Zoom(双指缩放)等触控功能。HSmartWindowControlWPF 提供了手动执行这些触控手势需要的所有触控事件,例如 TouchDown(触摸按下)、TouchMove(触摸移动)和 TouchUp(触摸抬起)。但是,不同触控点的处理很快就会变得复杂起来。方便的是,WPF 框架已经为控件提供了处理多点触控事件(称为“操作”)的内置功能。
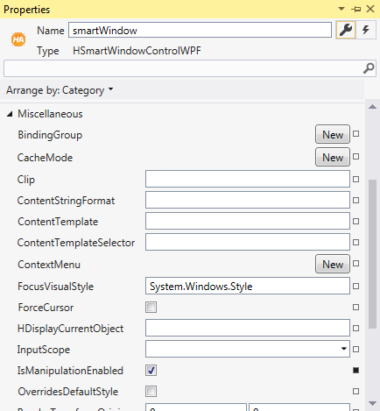
首先,我们必须通过启用 IsManipulationEnabled 选项激活 HSmartWindowControlWPF 的操作。之后,我们就能使用 ManipulationStarted 和 ManipulationDelta 事件。 一旦开始触控输入,就会立即触发 ManipulationStarted 事件。这时,我们必须存储原始操作原点的行坐标和列坐标。这些图像坐标应始终位于操作原点,从而实现图像的自然运动。

- smartWindow.HalconWindow.GetPart(out row1, out col1, out row2, out col2);
- double x = e.ManipulationOrigin.X;
- double y = e.ManipulationOrigin.Y;
- widthControl = smartWindow.ActualWidth;
- heightControl = smartWindow.ActualHeight;
- row = (int)(row1 + (y / heightControl) * (row2 - row1));
- col = (int)(col1 + (x / widthControl) * (col2 - col1));
- double x = e.ManipulationOrigin.X;
- double y = e.ManipulationOrigin.Y;
- double scale = e.CumulativeManipulation.Scale.X;
- double newHeight = (row2 - row1) / scale;
- double newWidth = (col2 - col1) / scale;
- double newRow1 = row - y/heightControl * newHeight;
- double newCol1 = col - x / widthControl * newWidth;
- double newRow2 = row + (1 - y / heightControl) * newHeight;
- double newCol2 = col + (1 - x / widthControl) * newWidth;
- smartWindow.HalconWindow.SetPart(newRow1, newCol1, newRow2, newCol2);
|